Wednesday, February 29, 2012

Kitchen Antiques

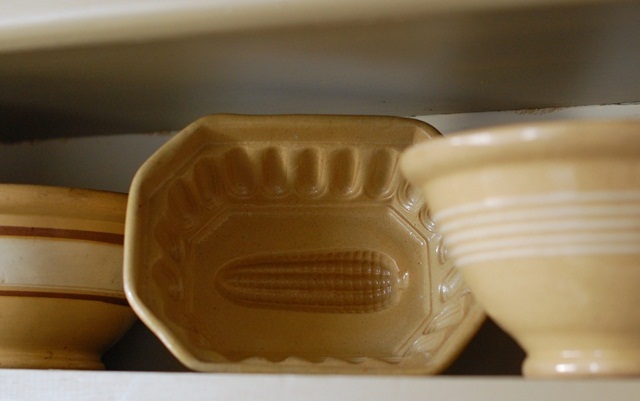
Ok, I confess... I have a little bit of a "thing" for primitive kitchen collectibles. Wooden bowls, stoneware crocks full of rolling pins and wooden spoons, butter molds, butter paddles, antique yellow ware, bread boards, spice cabinets with little drawers... I love them all. They add so much warmth and history to a kitchen - a room which can easily become overpowered by microwaves, coffemakers, and sleek, shiny, professional-grade appliances (not that my kitchen is in any danger of that last one).
Here's a sampling of some of my favorite kitchen antiques from my own kitchen...


Want to see even more kitchen collectibles? Check out my "Collecting - Wood" and my "Collecting - Yellowware" boards on Pinterest!

Wednesday, February 15, 2012

Collecting Vintage Flower Frogs

Vintage flower frogs are one of the very first things I began collecting. They are inexpensive, look great displayed en masse, and can be found in all sorts of different shapes, sizes, styles, colors, and materials. Designed to help shape floral arrangements, a flower frog would sit at the bottom of a vase and holds the flower stems in place, usually with short spikes, a glass disk with holes, or a wire grid. I collect metal frogs in every size and shape, from teeny tiny spiked frogs to giant cage styles.
I have my flower frog collection displayed in a painted wooden bowl in front of our television, flanked by two big white pineapple garden finials. Metal flower frogs are often found with various shades of green paint, to blend in with the flower stems, but lately I've honed my collection to focus on frogs mostly in neutral shades of greys, whites, browns, and blacks. They are a little harder to find, but I love the look of a monochromatic collection, and the patina on these bare metal frogs is beautiful.
This tiny little black spike frog is one of my favorites.
I even used my collection of flower frogs to inspire the name and logo for my Etsy shop and blog. The flower frog graphic that I use on all of my tags, business cards, and web branding is actually a photograph of the little grey frog on the top of the stack shown above. I manipulated the photograph in Photoshop to create a black and white image with a hand-drawn sketchbook feel rather than a literal photograph. See the resemblance?
I have developed a knack for spotting flower frogs wherever I go, be it a flea market, antique shop, or garage sale, so in order to keep my own collection modestly sized and cohesive, I sell many more than I keep. I can't say that about everything! Here's a few of the frogs that are up for sale right now...
If you're anything like me, once you buy your first flower frog you won't be able to stop with just one!

Tuesday, February 14, 2012

A Grain Sack Pillow for the Bedroom

 Happy Valentine's Day! In honor of this day of romance, I thought I'd give you a peek into our bedroom, and show you the latest addition to my bed linens. I have our bedroom decorated in natural shades of linen, grey and white, with an accent of red in the pillows, blankets, and other textiles.  
The newest piece of bedding I bought is actually not new at all... It's an antique European grain sack, with the wonderful nubby texture and neutral flax color that I love so much. Now, normally I go straight for the striped sacks, but this extra-long plain sack with a simple red embroidered monogram was just what I needed to complement all of the other patterns and textures I already have on my bed. I choose this particular grain sack because of the length - at 59" long, it is the perfect size for to use as a bolster pillow on a 60" wide queen size bed.
I stuffed it with a king size pillow plus a standard pillow to get a full, over-stuffed look. At this size, it is perfect for laying across the head of the bed. Before, when I would make the bed, I used to fold back the gray and red checked blanket, as well as the white blanket and top sheet underneath, and stand up four standard pillows in regular pillowcases, like this...

BEFORE
Nothing wrong with that... but it was a lot of pillows standing at attention, and it didn't have that simple, unfussy, antique look that I wanted.

AFTER
Now, it has a much more simple, primitive look. I cover our regular sleeping pillows with the grey checked blanket and lay the grain sack bolster across the top. A pair of vintage-inspired pillows (the striped one is from Pottery Barn, and the coverlet design is from Family Heirloom Weavers) add some additional pattern without going pillow crazy. I do have a tendency to go pillow crazy... but I was able to practice some restraint this time! 
A close-up of the GE monogram. It's got my initial! I told my hubby we need to start calling him George or something so that it fits. He was not amused.
Since the end of the pillow I used to stuff the sack was visible, I covered it with a piece of french-inspired striped fabric, and used a safety pin to fasten the sack together in the center. A safety pin, you ask?
Yep, there it is! Luckily, the nubby hemp fabric is thick enough that the edges just naturally cover the pin, unless you're looking up from underneath. I'd like to find an antique button yet to stitch on top, so it looks like it's held together by the button. But that's a project for another day.
And, just so you don't think I've let good pillows go to waste, I made room for a couple more...
A quilted pillow from TJ Maxx covers up dirty laundry in a wicker basket under the window...
A small lumbar pillow sits on a windsor chair by the door...

 And a striped pillow stands guard over my bench full of decorating magazines. See? No pillow left behind!

Monday, February 13, 2012

The Quilt


After a rather discouraging first attempt at hand-quilting, I am happy to report that I am back in the saddle! For the last several months, my quilt has sat folded up in the basement, lonely and untouched, sporting only a few pitiful lines of too big, uneven stitches. I had even started machine quilting a second quilt, and decided that hand quilting just wasn't for me. The process was just too overwhelming. I had all but given up.

But, about a month ago, I brought my quilt back upstairs and got out my little sewing box again. I had read a book from the library about hand quilting ("The Perfect Stitch" by Dierdra A. McElroy), that broke down the quilting stitch into step-by-step instructions, along with copious pictures. I thought I'd give hand quilting one more shot. And, lo and behold... it worked! After the first few wobbly stitches, my fingers seemed to picked up the rhythm, and before long I was producing straight rows of small, evenly spaced quilting. A small miracle...


The stars are getting quilted with an outline at 1/4" both inside and outside the seam, and then the whole block is stitched diagonally from corner to corner, as well as a straight line through the middle from top to bottom, and left to right. It breaks the star into eight pointed segments, which I really like.


The linen colored sashing strips are getting outlined 1/4" inside the seam, and then quilted with two straight lines down the center, creating almost a striped effect.


The quilting in this dark blue star is some of my earliest stitching. See how much bigger the stitches are than the diagonal line of quilting on the white fabric on the right-hand side of the picture?

 Another thing that really helped me is finding the right thimble. I started with one of the big inexpensive leather ones (the kind with an elasticized knit part at the bottom), but it started to fall apart almost immediately and didn't offer my finger much protection. So a few weeks ago I bought this little golden yellow leather thimble by Clover, and I love it. It has a dimpled metal piece at the finger tip, just like a traditional thimble, but it has a soft leather body so it's super comfortable and flexible. I found it at Joann's for $12.99. It is great.


See, my stitching is getting better! In the end, it's going to look like two different people quilted this quilt, but that's okay with me. It's a learning quilt.


I keep the quilt in a vintage wicker basket in the living room, so it can be on display even before it's finished. I've discovered that I really like being able to just pick up and quilt whenever I want - usually on the couch in front of the TV in the evenings. It's quiet, takes no set up other than threading a needle, and I can hang out with my husband rather than being holed up in the cold, dark basement with my sewing machine. I still have a long way to go on this one, but I am finally enjoying the process. Another small miracle!

Thursday, February 9, 2012

For the Love of Ironstone


Because somedays your cupboard full of ironstone just begs to be photographed...
Related Posts Plugin for WordPress, Blogger...